


To export a song from Logic Pro, go to File > Bounce > Project or Section, configure your export settings like file format and quality, then click "Bounce" to create your audio file.
What is Bouncing in Logic Pro?
In Logic Pro, bouncing is the process of rendering your project into a final audio file, combining all tracks, effects, and automation. This allows you to create a high-quality mixdown that can be played on any device, uploaded to streaming platforms, or sent for mastering.
Logic Pro offers offline (faster) bouncing for quick exports and real-time bouncing when using external MIDI gear or hardware effects. You can also bounce individual tracks as stems for mixing or collaboration.
How to Export a Song from Logic Pro
1. Open the Bounce Window
Go to File > Bounce > Project or Section to access the export settings.
2. Configure Export Settings
In the Bounce window, select your desired Destination format(s) from the following options:
- PCM: For uncompressed audio formats such as AIFF, WAV, or CAF.
- MP3: For compressed audio suitable for sharing.
- M4A (AAC): Another compressed format, commonly used for Apple devices.
- Burn to CD/DVD: Directly burn your project to a disc.
Depending on the selected Destination, the options on the right side of the Bounce window will adjust accordingly:
For PCM (AIFF, WAV, CAF):
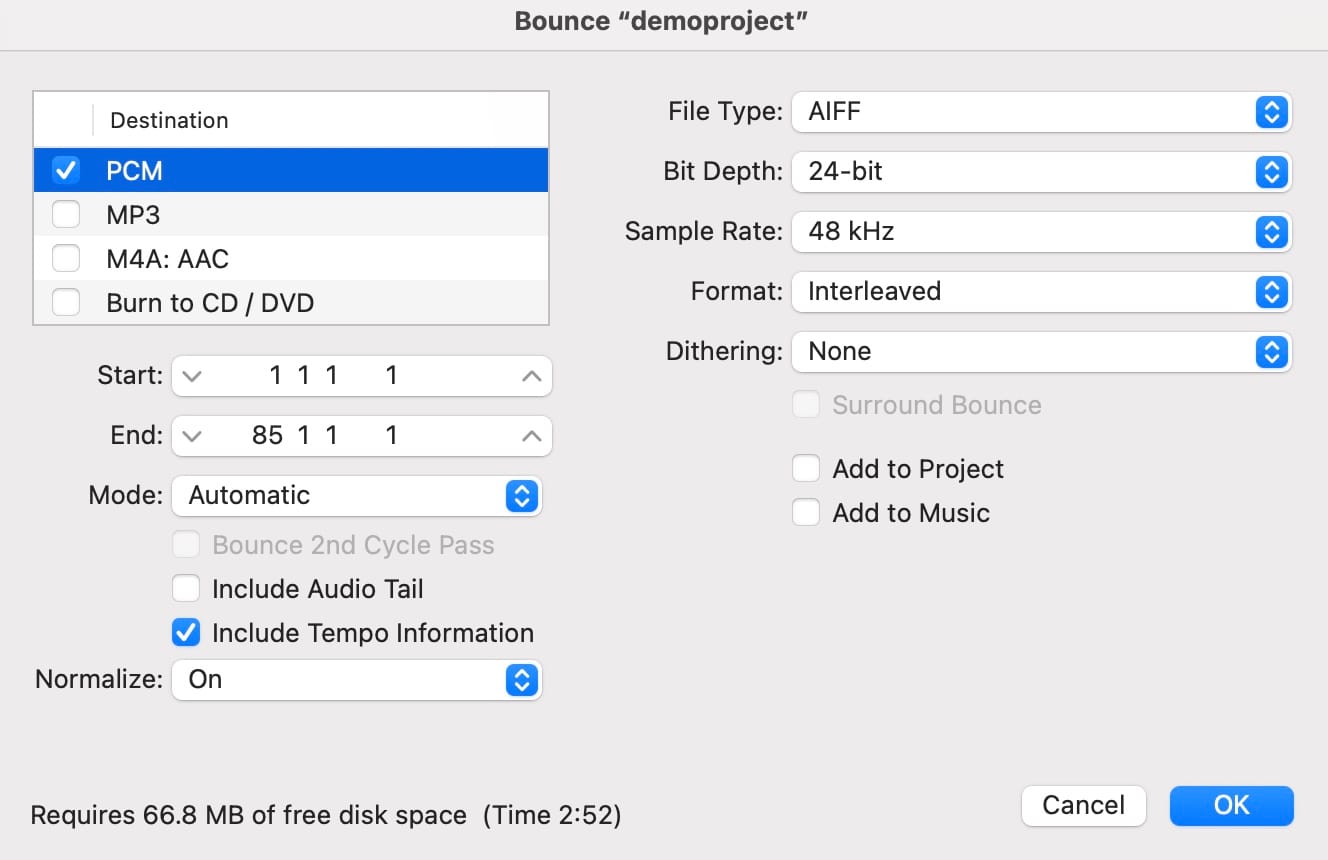
- File Format: Choose between AIFF, WAV, or CAF.
- Resolution (Bit Depth): Select 8-bit (low quality, reduced file size), 16-bit (CD/general playback quality), 24-bit (high quality audio and mastering), or 32-bit float (for projects requiring extensive dynamic range).
- Sample Rate: Options range from 11.025 kHz to 192 kHz. 44.1kHz is standard for music and streaming.
- File Type: Choose Interleaved (single stereo file) or Split (separate mono files for each channel).
- Dithering: Apply dithering when reducing bit depth.
- Add to Project: Include the bounced file in the project audio browser.
For MP3:
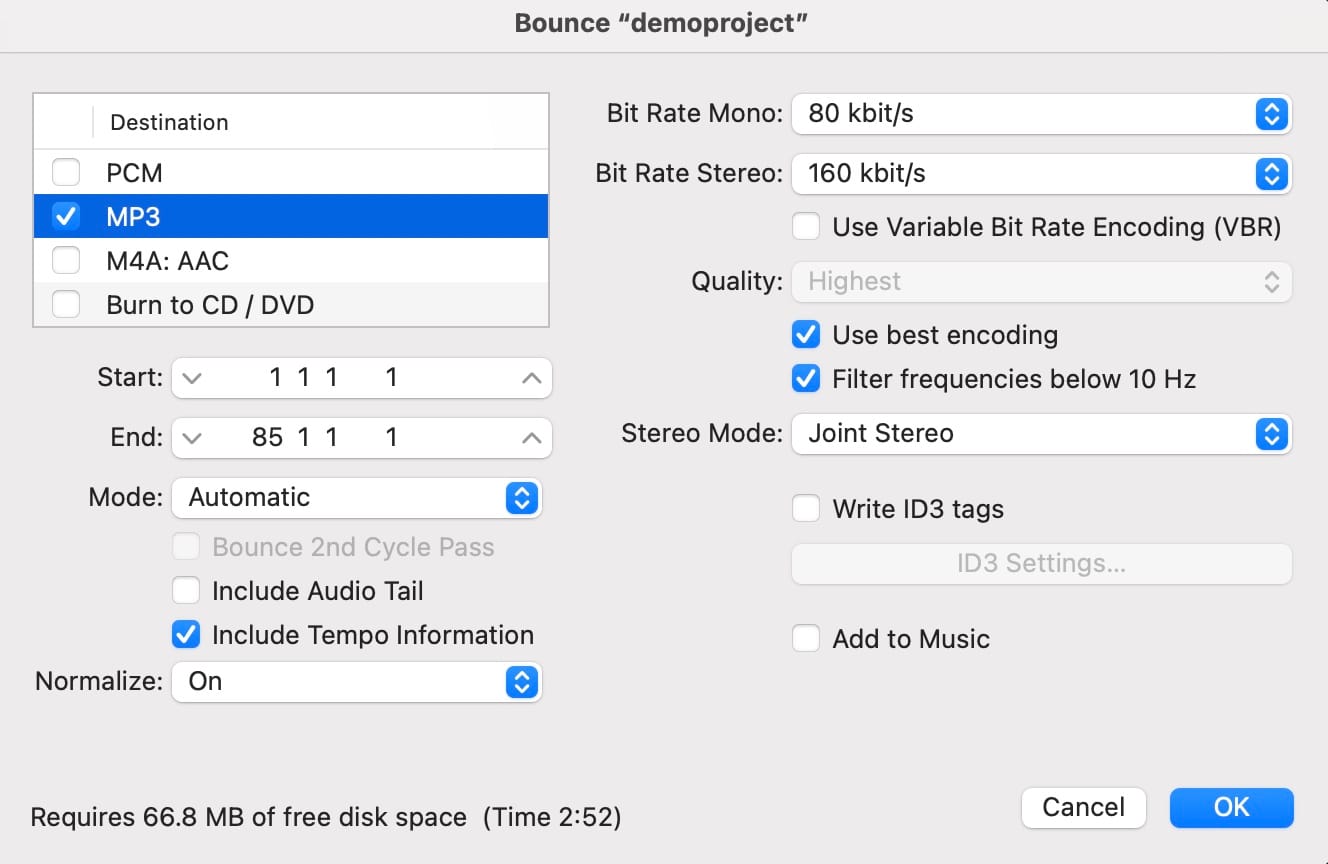
- Bit Rate Mono: Select the desired bit rate for mono files (e.g., 32 kbps to 320 kbps). Note that this setting is relevant only when exporting a mono file; for stereo exports, this setting is ignored.
- Bit Rate Stereo: Choose the bit rate for stereo files. Higher bit rates (e.g., 192 kbps or 320 kbps) provide better audio quality but result in larger file sizes.
- Stereo Mode:
- Joint Stereo: Encodes shared information between channels efficiently, often resulting in better compression without significant loss of quality.
- Normal (Stereo): Encodes each channel separately, which may be preferable for recordings with distinct left and right channel information.
- Additional Options:
- Use best encoding: Enables the highest quality encoding algorithm, which may increase processing time.
- Filter frequencies below 10 Hz: Removes inaudible low frequencies that can interfere with playback on some systems.
- Write ID3 tags: Allows embedding of metadata such as track title, artist, album, and more into the MP3 file.
- Add to Music: Automatically add the bounced file to your music library.
For M4A (AAC):

- Encoding:
- Advanced Audio Codec (AAC): Utilizes higher compression, resulting in smaller file sizes with maintained quality.
- Apple Lossless (ALAC): Provides lossless compression, preserving original audio quality without data loss.
- Bit Rate: (Available only when AAC is selected)
- Choose a rate from 64 kbps to 320 kbps. Higher bit rates offer better audio quality but result in larger file sizes.
For Burn to CD/DVD:
- Mode:
- CDDA: Burns the project to a standard audio CD. If your project's sample rate exceeds 44.1 kHz, Logic Pro will automatically convert it to 44.1 kHz, as this is the standard sample rate for audio CDs.
- DVDA: Burns the project to a DVD-Audio disc. This mode supports higher sample rates, allowing for enhanced audio quality.
- Device: Select the disc burner you wish to use from the available options.
- Speed: Choose the desired write speed for burning the disc.
- Dithering: Select a dithering algorithm to minimize quantization errors during bit depth reduction.
- Additional Options:
- Simulate Write Only: Performs a trial run of the burning process without writing data to the disc, allowing you to verify that the process will complete successfully.
- Write as Multi-Session: (Available only for CDDA mode) Enables adding more data to the CD in future sessions.
Note: When selecting Burn to CD/DVD, the Surround and Split Stereo options in the PCM settings are automatically disabled, as CD and DVD-Audio formats utilize interleaved stereo files.
After configuring these settings, click "Bounce" to initiate the burning process.
3. Start the Export Process
After configuring your export settings, click Bounce to initiate the export.
4. Wait for the Bounce to Complete
Logic Pro will process your project and generate the final audio file. By default, Logic performs an offline bounce, which is faster than real-time. However, if your project includes external hardware instruments or certain live input sources, Logic will require a real-time bounce, matching the project's playback duration.
5. Locate Your Exported File
Once the bounce is complete, navigate to the destination folder you specified to find your exported file.
FAQs
What's the difference between bouncing and exporting?
In Logic Pro, bouncing refers to rendering your entire project or a specific section into a single audio file, incorporating all tracks, effects, and automation. Exporting, on the other hand, often pertains to saving individual tracks or regions as separate audio files, which is useful for collaboration or further mixing.
Should I export my song as a stereo or mono file?
For most applications, exporting as a stereo file is advisable, as it preserves the spatial characteristics of your mix. Mono files are typically used for specific purposes, such as certain broadcast scenarios or when preparing audio for mono playback systems.
What sample rate should I choose for exporting?
- 44.1 kHz – Standard for CDs and most digital platforms.
- 48 kHz – Used for professional video and film production.
- Higher sample rates (88.2 kHz, 96 kHz) – Typically for high-fidelity recording.
If unsure, stick with 44.1 kHz unless you're working in a film or high-resolution audio project.
What bit depth should I use for exporting?
- 24-bit – Best for professional applications and mastering.
- 16-bit – Used for CDs and general consumer playback.
When exporting at 16-bit, applying dithering (such as POW-r) is recommended to minimize quantization noise. For 24-bit exports, dithering is typically unnecessary.
Should I normalize my exported file?
Normalization adjusts the audio file's gain to maximize volume without clipping. In Logic Pro, selecting "Overload Protection Only" ensures that the file doesn't exceed 0 dBFS, preventing distortion while preserving the original dynamics. It's generally advisable to leave full normalization off to maintain the intended dynamic range of your mix.
What's the difference between WAV, AIFF, and CAF formats?
- WAV (Waveform Audio File Format): A widely-used uncompressed format compatible across various platforms.
- AIFF (Audio Interchange File Format): An uncompressed format developed by Apple, similar in quality to WAV.
- CAF (Core Audio Format): A flexible format by Apple, supporting extensive metadata and large file sizes, suitable for lengthy recordings.
All three formats offer high-quality audio; your choice depends on compatibility requirements and specific project needs.
Should I export my song as an MP3?
MP3 is a compressed audio format that reduces file size at the expense of some quality. While it's convenient for sharing and online distribution, it's advisable to retain an uncompressed master (such as WAV or AIFF) for archival and professional purposes. Use MP3s for situations where smaller file sizes are beneficial, like emailing demos or uploading to platforms with file size limitations.
How do I export individual tracks from Logic Pro?
To export separate stems (individual tracks):
Go to File > Export > All Tracks as Audio Files.
This exports each track as a separate file, useful for remixing or collaboration.
How do I export a specific section of my song?
To export a particular section:
- Set the Cycle Range to encompass the desired section by dragging the cycle area in the timeline ruler.
- Go to
File>Bounce>Project or Section. - In the Bounce window, ensure "Cycle Area" is selected to export only the defined section.
- Adjust any additional settings as needed, then click "Bounce" to export the specified segment.
Can I export my Logic Pro project with plugins and automation?
Yes, when you bounce or export your project, Logic Pro includes all active plugins, effects, and automation in the resulting audio file. If you prefer to export tracks without certain effects, you can bypass or disable those plugins before exporting. Alternatively, to export dry stems, ensure that only the desired raw audio is active on each track during the export process.


